Wednesday, October 24, 2007
Lost Wax
So I started another lost wax project, getting some inspiration from both my clay models and a beautiful South Indian bronze of Vishnu as Matsya that I picked up in Chidambaram, Tamil Nadu. I bought some low melt metal from Tiranti's near Warren Street. The man assured me it was lead free pewter - however it seems to have a smidgeon of the stuff therein. Please wash your hands before you eat your rice & curry.


Sunday, October 14, 2007
More Gel Flex Aums
 Due to the success of last season's must have aum, I made a new clay model and a gel flex mould. I had to melt down the first one, as I forgot to create a significant enough clay wall and gulley around the object that could act as an edge once the mould was made. Anyway, the second go worked out fine:
Sunday, October 07, 2007
Clay Models

I started my second year at Mary Ward by making some shapes in clay to give me inspiration. I found I liked the shapes I could make from rolling out the clay with a rolling pin and then forming an abstract shape by rolling, throwing or dropping the resultant clay sheet. Some were fired and one has so far been glazed with a metallic finish. The glaze took 3 coats and had to be set on blocks in the kiln as the glazed bottom would have glued it to the kiln surface! Sorry.

Monday, October 01, 2007

Friday, August 31, 2007
Alabaster
 Here is a small piece of alabaster fashioned into an out of focus necklace ...
It could have been thinner but I thought I'd stop before I broke it. Anyway Mal likes it.
Thursday, August 09, 2007
Stone Carving

I learnt some stone carving techniques over the summer, working mainly with soapstone. I used a gouge and a hammer and chisel to hack bits off, carve and make holes in a lump of green mottled soapstone. The finish is quite rough until smoothed down with files or rasps and buffed up with sandpaper, rag and polish.
 One issue is that only when you have buffed the sculpture that you can really see all the imperfections. So it can be quite an iterative process. The piece pictured is nowhere near as smooth as it could be.
It is easier to smoothe out a smaller more regular piece like this aum.

Tuesday, July 03, 2007
Hand Cast in Plaster
It looks almost real. See below for the easy steps a person should take if you want to cast your own body parts for posterity!


Hand Cast

First mix the alginate with an equal volume of water. It sets very quickly so you have to mix it quickly too!

Pour the mix into a suitable container (here a sawn off water bottle) and plunge in the limb that you wish to caste. Pretty soon you are stuck fast.

Now for the life of me can I get this off?

Eventually yes! Fill with plaster and wait a while. It's best to use hard plaster such as "crystocal" but as MWC had run out I had to use a softer fine plaster which makes the mould more brittle. Finally away the alginate and here is the finished cast of my hand in a meditation mudra.

My Old Cast Off Clay Head
Is now a scary garden flower pot ... waste not, want not I say. He lost his ears and a bit of his nose when the plaster mould was made.


Monday, June 25, 2007

Life Model
And then one afternoon, I was lucky enough to have a go at life modelling in clay. Renata the model sat on a revolving table which she turned a quarter every 10-15 mins. I only had two hours but decided to fire the resulting effort as it shows up quite clearly the difficulties in trying to represent the human form. My "Renata" has extremely long arms for example!


Thursday, June 21, 2007
Face Casts
I touched up a couple of holes in the original cast: it's important to wet the mould first so that it doesn't suck all the moisture from any new plaster applied and cause the new to fail to bind with the old plaster. I think it looks pretty good now. 
Then although the algernate was breaking up a bit (note the fissure lines and the squashed nose) I managed to put it back together and make a second cast. Interesting effects.

A third cast was made a week later from the remaining algernate bits that could still be used - see these "pieces of me". Remember to paste wet plaster onto the algernate first and then add scrim to strengthen, pasting that in with more wet plaster. The algernate was much harder after a week and more difficult to take off the plaster cast - see the bits of blue still stuck on these pieces.

The plaster masks created to hold the algernate on the face as it dried are actually quite interesting in themselves. They remind me of tribal masks from New Guinea. Perhaps I will decorate them as such.


Then although the algernate was breaking up a bit (note the fissure lines and the squashed nose) I managed to put it back together and make a second cast. Interesting effects.

A third cast was made a week later from the remaining algernate bits that could still be used - see these "pieces of me". Remember to paste wet plaster onto the algernate first and then add scrim to strengthen, pasting that in with more wet plaster. The algernate was much harder after a week and more difficult to take off the plaster cast - see the bits of blue still stuck on these pieces.

The plaster masks created to hold the algernate on the face as it dried are actually quite interesting in themselves. They remind me of tribal masks from New Guinea. Perhaps I will decorate them as such.

Thursday, June 14, 2007
Face Casting Again
As described with Abigail's face cast, she helped me use the same process on myself this week. You can see where the straws were sticking out of my nostrils.


Tuesday, June 12, 2007

Friday, June 08, 2007
Face Casting with Abigail
Later, I helped cette avant garde artiste - Abigail - to cast her own face! The process works as follows: cover the hair, apply vaseline to eyebrows, eyelids etc. (or they'll be extracted!), stuff some straws up your nose so that you can continue to breathe, then lie back while a friendly assistant mixes the bright blue algernate and then pours it over your head. Plaster bandage is then wrapped around the disappeared Abigail to support the algernate and make a stronger mould. The algernate sets in 3 minutes and after 15 mins we carefully peel it off to reveal the cleansed face of the victim.
 In this particular case the MW bandages were old and didn't harden properly so we had to balance the mould in two bowls to keep the shape. Plaster was then carefully pressed into the mould with fine scrim (mesh) bandage to add strength. Ultimately a plaster face will be created from the mould.
I am having a go at this in a laboratory near you soon!
 In this particular case the MW bandages were old and didn't harden properly so we had to balance the mould in two bowls to keep the shape. Plaster was then carefully pressed into the mould with fine scrim (mesh) bandage to add strength. Ultimately a plaster face will be created from the mould.
I am having a go at this in a laboratory near you soon!
Thursday, June 07, 2007
Gel Flex
This week I tried making a gel flex mould. Gel flex is something like vinyl and looks like sweaty cheese. I melted the gel flex cubes in this melting pot. 
 Next I made a simple mould in clay - it's the Indian "aum" simple - oneness with universal consciousness and all that. A clay wall is added to hold and this holds in the molten gel flex.
Here I am pouring it in.
And here is the (still quite hot) mould being prised out an hour later. Then I made a
simple plaster cast and behold a slightly bubble marked but perfectly acceptable "Aum". Or even ॐ ! 

 Next I made a simple mould in clay - it's the Indian "aum" simple - oneness with universal consciousness and all that. A clay wall is added to hold and this holds in the molten gel flex.
Here I am pouring it in.

And here is the (still quite hot) mould being prised out an hour later. Then I made a


Friday, May 25, 2007

Thursday, May 24, 2007
The Finished Cement Fondue Head
 enjoys the flowers in a postage stamp garden!
 Having repaired the broken ears, filled in a few holes, filed down the rough edges and made a base with Paul's help, the final model was left to set. It's important to keep the sculpture wrapped in wet cloths and therefore damp so that the cement will set properly.
4 different pastes were then used to bring out the bronzelike finish shown here: a graphite paste, two types of bronze paste and a turquoise - what's it called Vertigina or something? Each was buffed up with a rag to bring out the finish.
Behind you!
Saturday, May 12, 2007
Chipping Out Of The Mould

I break away the plaster mould and finally the cement fondue head appears. Clare does the same. Unfortunately my ears are not complete as I had not got enough cement or fibre glass into these narrow gaps. Pieces break off but this can be repaired with goo (cement & water). Also, the pieces of plaster must all be chipped off and the sculpture washed.
Thursday, April 26, 2007
Getting There
Back for the summer at MWC. Have now made two cement and one fibre glass & "goo" layer inside the oiled mould. The cement is made by mixing cement:sand:water in the ration 6:2:1. A thin layer is pressed into the mould, ideally only a few grains thick, so that it doesn't move. I messed this bit up a bit second time around and expect to see the effects when the final objet d'art is revealed next week! The goo is custard constituency cement and water and the fibre glass for which you need a mask and gloves is easily broken up from a big sheet into little pieces. We wet it first to minimise dust and then just pulled it apart. Cutting is not advisable as it produces more glass shards & dust. Finally when the layers were in place, the two sides of the mould were put together, fastened with rubber bands and then a final layer of fibre glass and goo was pasted across the joins. The base was also strengthened with goo and fibre glass. The whole is then wrapped up with wet cloths and inside plastic bags. The cement would not set properly without this apparently. Fingers crossed.
Thursday, March 29, 2007

Thursday, March 22, 2007
Do The Greats Do These Bits?
I wonder. Hmmm. The clay mould set hard, then had to be prised apart, then carefully scrubbed clean. It took ages to get the little bits of clay out of every nook and cranny. Then the whole thing needed basting with engine oil - seriously! All of that took 2 sessions - 5 hours; Henry Moore eat your heart out. Apparently he just made everything in polystyrene or found an interesting stone and then told some workmen to replicate. One day, one day ... anyway here is the oiled mould:


Thursday, March 15, 2007
Plaster Mould

Plaster is thrown at and pasted onto the clay to form the mould. You can see the line of clay on top of the shims, effectively keeping the 2 plaster halves apart. This will enable the two sides of the mould to be easily prised apart. The plaster needs to be about an inch thick.
Thursday, March 08, 2007
Shimming

A plaster mould will next be made from the clay model. This mould needs to be in 2 sections and to achieve this, a barrier of metal "shims" is created through the middle of the model. I had to use cut up pieces of old beer cans. These need to fit very snugly together to prevent any plaster bleeding through the divide. An edge of clay is added to act as a clear marker once plaster is added.
Thursday, February 22, 2007
Greeks

Well, the head is looking better with some hair and the ears are now not bad. Last week I visited the British Museum. I wanted to get some ideas of how sculptors down the ages had created ears and eyes. The Greek statues have blank eyes like this, apparently because they were originally painted. Anyway, next I'll try to do something with the eyes.
Final Clay

It was really difficult to get the eyes right and I needed Paul's advice.
In the end I went for gouging out a hole to indicate the pupil and made a slight indent for the eyeball. This is the final clay model - it does have a hint of me I think. Next I will need to make the plaster mould.
Thursday, February 15, 2007
Clay Head Progress
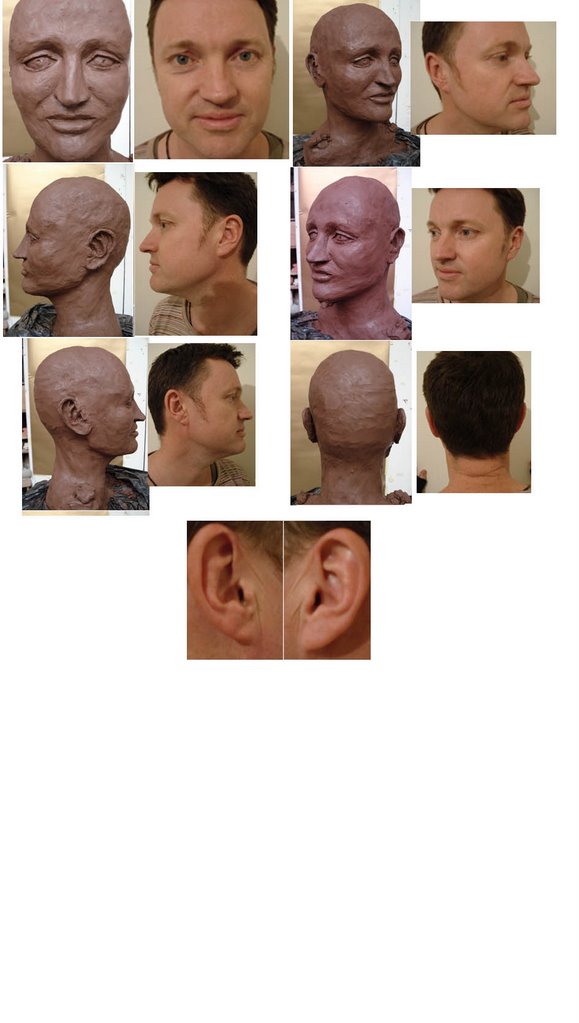
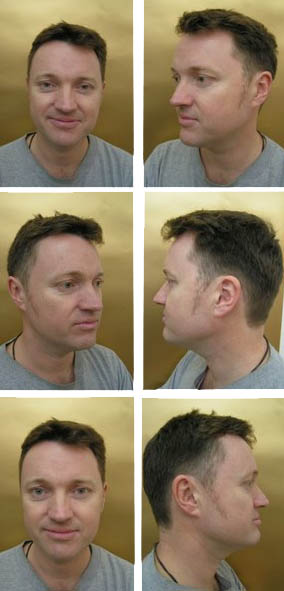
Progress has been slow, but it does take time to get not only the individual features right (or at least plausible) in themselves but also in relation to each other and as a whole. I get Paul's feedback every now and then and find out: ears are not just stuck on but flow from the cheek, lie behind the jawline and always contain a C and a Y; lips do not end in points, they are rolls of flesh; your eyes are actually quite far back into your head and round to the side.
I created these comparison photo montages using Photoshop - they will help me sort out where the sculpture needs tweaking!

I created these comparison photo montages using Photoshop - they will help me sort out where the sculpture needs tweaking!

Thursday, February 01, 2007
Head progress
Another 2 and a half hours with a little progress – worked on the mouth and face shape. I had been away for couple of weeks so was glad I had wrapped the model tightly in a plastic bag so as to retain moisture. It was still perfectly workable.

I think it's human anyway.

Maybe some ear work next?


I think it's human anyway.
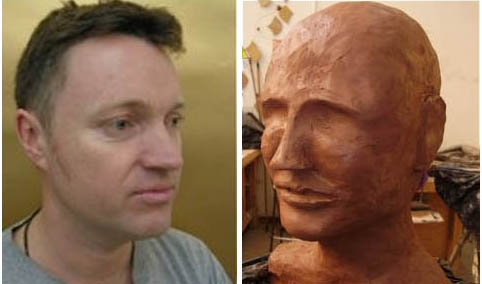
Maybe some ear work next?

Thursday, January 11, 2007
Cement Fondue 2
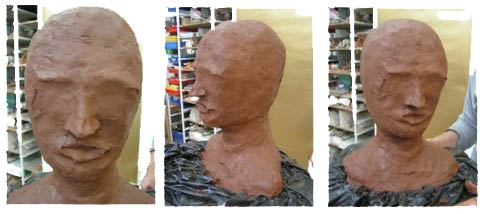
Following Paul’s direction, rolled up newspaper in a rough head shape is put in a plastic bag and wound round a wooden block, tied with fine wire. Clay is then moulded onto this basic frame. This is hard work. Will it be human?
Cement Fondue
Subscribe to:
Posts (Atom)